

How to Use Drywall Anchors: A Step-by-Step Guide
Oct 5th 2025
Hanging a picture frame should be simple—until it comes crashing down in the middle of the night. Drywall lacks the strength to hold screws securely on its own. Even lightweight items can pull free, leaving unsightly holes and damaged walls.
Drywall anchors solve this problem by distributing weight across a larger area and providing secure mounting points where wall studs aren't available. Whether you're hanging shelves, mounting televisions, or installing bathroom fixtures, understanding how to use drywall anchors correctly ensures your items stay safely in place.
At The Nutty Company, proper installation starts with the right knowledge and quality fasteners. Let's walk through everything you need to know about using drywall anchors effectively.
What Are Drywall Anchors
Drywall anchors are specialized fasteners designed to provide secure mounting points in hollow walls where traditional screws would simply pull out.
Standard drywall measures only 1/2 to 5/8 inch thick and crumbles easily under stress. This makes it unsuitable for supporting weight without reinforcement.
Types of Drywall Anchors
Understanding the different types of drywall anchors helps you match the right fastener to your project requirements.
Plastic Expansion Anchors are the most basic option, suitable for lightweight items up to 10-20 pounds. These ribbed plastic sleeves insert into pre-drilled holes and expand as you drive screws into them. They work well for hanging lightweight picture frames, small decorative items, and light-duty hooks.
Self-Drilling Anchors feature sharp threads and pointed tips that drive directly into drywall without pre-drilling. These metal anchors handle medium-weight items up to 50 pounds and install quickly with just a screwdriver or drill. They excel for towel bars, small shelves, and medium-weight decorations. They're among the easiest anchors to install, making them popular for DIY projects.
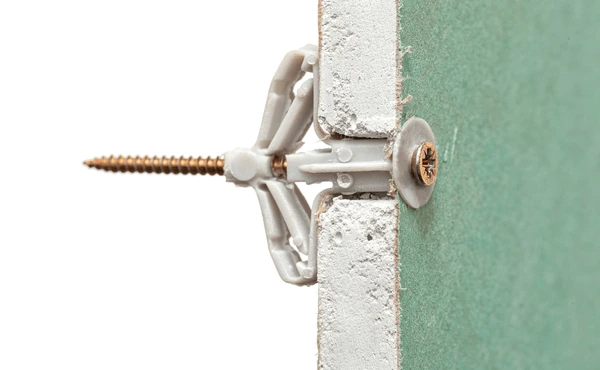
Toggle Bolts provide the strongest hold in drywall, supporting 50-100+ pounds depending on size. These heavy-duty anchors consist of a bolt with spring-loaded wings that fold for insertion through a drilled hole, then spring open behind the drywall. Toggle bolts work exceptionally well for heavy shelving, large mirrors, grab bars, and mounting televisions.
Molly Bolts feature metal sleeves that expand behind the drywall when you tighten the screw. These anchors support 25-50 pounds and remain in place even when you remove the screw, allowing repositioning. Molly bolts work well for medium to heavy applications like shelving and fixtures that might need future adjustment.
Winged Plastic Anchors combine the economy of plastic with improved holding power through fold-out wings that brace against the back of the drywall. Supporting up to 50 pounds, these anchors provide better performance than standard expansion anchors while remaining more affordable than metal alternatives. They're ideal for hanging medium-weight mirrors, shelving, and decorative items.
Choosing the Right Wall Anchor for Your Project
Selecting the appropriate anchor type ensures secure installation and prevents wall damage or item failure.
Consider Weight First: The weight of your item is the primary selection factor. Lightweight items under 10 pounds need only plastic expansion anchors. Medium-weight items between 10-50 pounds require self-drilling anchors or molly bolts. Heavy items over 50 pounds demand toggle bolts. Always add a safety margin, so if an item weighs 40 pounds, use anchors rated for 50+ pounds.
Wall Material Matters: Standard 1/2-inch drywall works with all anchor types. Thicker 5/8-inch drywall provides slightly better holding power. Plaster walls require different techniques and often need specialized anchors. Always check wall thickness before selecting anchors.
Find Wall Studs When Possible: For the strongest possible hold, locate wall studs and use nuts and screws driven directly into the framing rather than relying solely on drywall anchors. Use a stud finder to check for studs before drilling.
Tools and Materials You'll Need
Gathering the right supplies before starting ensures smooth installation.
Essential Items:
- Drill with appropriate drill bits (size depends on anchor type)
- Screwdriver or power driver with adjustable torque
- Hammer or rubber mallet
- Level for proper alignment
- Measuring tape and pencil
Check anchor packaging for the correct drill bit size. Power drivers with adjustable torque prevent overtightening. Rubber mallets prevent damage to anchor heads and surrounding drywall.
Step-by-Step Guide to Installing Drywall Anchors
Follow these steps carefully to install drywall anchors correctly.
Step 1: Select the Appropriate Anchor Type
Choose your anchor based on the item's weight and required holding strength. When in doubt, select a stronger anchor than you think necessary. It's better to have too much support than too little.
Step 2: Mark the Desired Location
Use a pencil to mark where each anchor should go. For multiple anchors, use a level to ensure proper alignment. Before drilling, check for wall studs using a stud finder. Avoid drilling within 12 inches of electrical outlets to prevent hitting wires.
Step 3: Drill a Pilot Hole (If Necessary)
Use the correct size drill bit specified on your anchor packaging. Self-drilling anchors skip this step. Drill straight into the wall perpendicular to the surface. Holes that are too small make insertion difficult. Holes that are too large prevent proper anchor expansion.
Step 4: Insert the Anchor Into the Hole
The insertion method depends on your anchor type:
- Plastic expansion anchors: Tap gently with a hammer until flush with the wall surface
- Self-drilling anchors: Screw directly into the wall
- Toggle bolts: Fold the wings and push the bolt through until the wings spring open behind the drywall
- Molly bolts: Slide into the hole with the collar against the wall surface
Step 5: Secure the Anchor in Place
Each anchor type secures differently:
- Expansion anchors: Secure when you drive screws into them
- Self-drilling anchors: Already secured once fully threaded into the drywall
- Toggle bolts: Pull the bolt outward while tightening to seat the wings against the drywall back
- Molly bolts: Expand when you tighten the screw, causing the sleeve to compress and grip
Step 6: Attach the Item to the Anchor
Align your item's mounting holes with the installed anchors. Drive screws through the item into the anchors. Don't fully tighten screws until all fasteners are started and you've confirmed proper alignment. Tighten screws gradually and evenly.
Tips for Successful Installation
Following best practices improves installation success and prevents common problems.
Drill the Correct Hole Size: This is critical for anchor performance. Too-small holes prevent proper insertion. Oversized holes allow anchors to spin or pull through. Always follow manufacturer specifications exactly.
Install Anchors Flush: Ensure anchors sit flush with the wall surface. Protruding anchors prevent items from sitting flat against the wall. Anchors driven too deep may damage the drywall or reduce holding strength.
Avoid Overtightening: Overtightening screws strips plastic anchors, cracks drywall around metal anchors, or causes molly bolts to over-compress. Tighten screws until snug, then stop. If using a power driver, set the torque limiter to prevent overtightening.
Common Mistakes to Avoid
Preventing these frequent errors saves time, materials, and wall damage.
Using Anchors Not Rated for Your Item's Weight: This is the most common and dangerous mistake. Overloaded anchors pull out of walls, potentially causing injury and property damage. Always choose anchors rated well above your item's actual weight. Remember that pulling forces (like on curtain rods or towel bars) generate more stress than straight downward loads.
Installing Anchors Too Close to Edges: Keep anchors at least 2 inches from edges and corners. There's less drywall to distribute load when anchors are too close to edges. Installing multiple anchors too close together also weakens the wall between them.
Not Checking for Studs First: Always use a stud finder before drilling. When studs align with your desired mounting locations, drive nuts and screws directly into the framing for far superior support than any anchor can provide.
Removing and Replacing Drywall Anchors
Knowing proper removal techniques minimizes wall damage when you need to relocate or remove mounted items.
Removal Methods by Type:
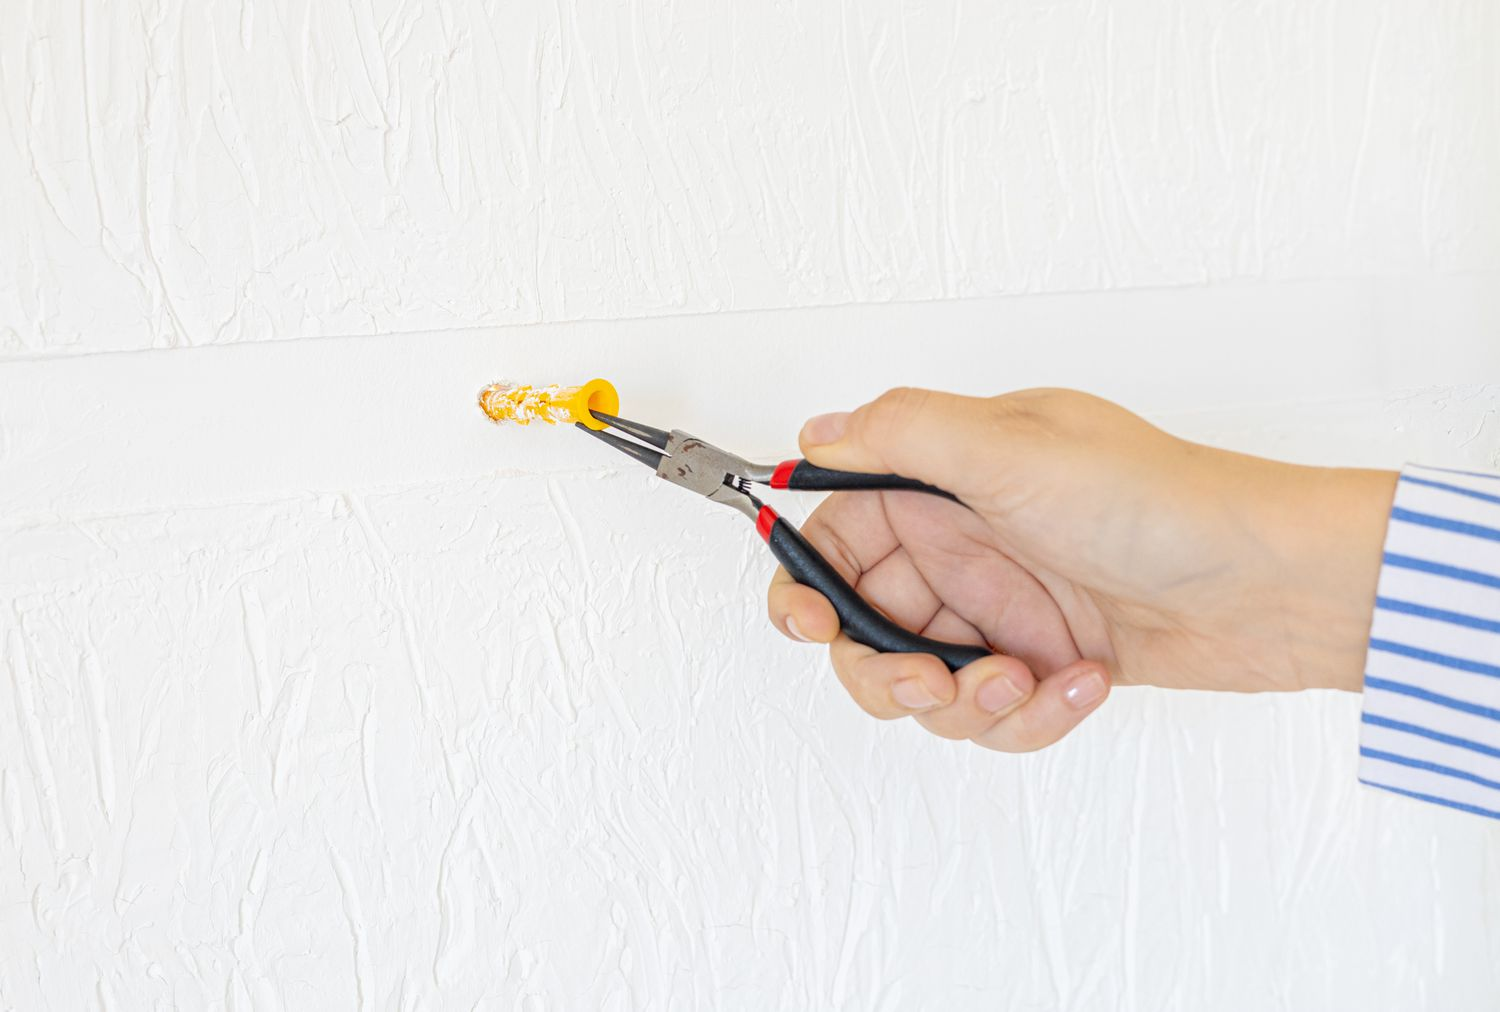
- Plastic expansion anchors: Unscrew the screw, then carefully pull the anchor out with pliers. If stuck, push the anchor through the wall into the cavity behind
- Self-drilling anchors: Unscrew directly from the wall by turning counterclockwise
- Molly bolts: Unscrew the bolt completely, then pull the assembly out
- Toggle bolts: Drop inside the wall when you remove the bolt and cannot be recovered
Patching Holes: Use spackling compound or lightweight joint compound to fill holes left by removed anchors. Apply with a putty knife, let dry completely, then sand smooth and touch up with matching paint.
Conclusion
Learning how to use drywall anchors properly empowers you to hang items confidently without fear of wall damage or falling objects. From basic plastic expansion anchors for lightweight decorations to heavy-duty toggle bolts for substantial fixtures, choosing the right anchor type and following proper installation techniques ensures secure, long-lasting results.
Remember the key factors: match anchor type to item weight, drill accurate pilot holes, install anchors flush with the wall surface, and never overtighten fasteners. When possible, locate studs for the strongest possible mounting using nuts and screws driven directly into framing.
The Nutty Company provides quality drywall anchors, nuts and screws, and expert guidance for all your fastening needs. Whether you're hanging a single picture frame or installing heavy-duty shelving throughout your home, proper anchor selection and installation techniques create secure, professional results that stand the test of time.
Frequently Asked Questions
How do I choose the right drywall anchor?
Choose drywall anchors based on three primary factors: item weight, wall type, and required holding strength. For lightweight items under 10 pounds, plastic expansion anchors work well. Medium-weight items between 10-50 pounds require self-drilling anchors or molly bolts. Heavy items over 50 pounds demand toggle bolts or mounting into wall studs. Always select anchors rated significantly above your item's actual weight, if something weighs 30 pounds, use anchors rated for 40-50 pounds.
Can I use drywall anchors on plaster walls?
Yes, but plaster walls require different considerations than drywall. Traditional plaster is much harder and denser than drywall, often requiring drilling through both the plaster surface and wooden lath behind it. Self-drilling anchors designed for drywall may not penetrate plaster effectively, and you'll typically need to pre-drill holes using masonry bits. When possible, locate studs behind plaster walls and screw directly into the framing for maximum holding power.
How much weight can drywall anchors hold?
Drywall anchor weight capacity varies dramatically by type. Plastic expansion anchors typically hold 10-25 pounds, suitable for lightweight pictures and decorations. Self-drilling anchors support 25-75 pounds depending on size, working well for towel bars and small shelves. Molly bolts handle 25-50 pounds, appropriate for medium-weight mirrors and fixtures. Toggle bolts provide the strongest hold at 50-100+ pounds, with larger toggles supporting even more. However, these ratings assume proper installation in sound drywall with appropriate safety margins. Always exceed minimum requirements—if hanging a 40-pound mirror, use anchors rated for 60+ pounds. For maximum security with heavy items, locate wall studs and mount directly into framing using appropriate nuts and screws.
Can I remove and reuse drywall anchors?
Generally, drywall anchors should not be reused. Most anchor types sustain damage during installation or removal that compromises their holding strength. If you must relocate an item, install fresh anchors in new locations. The Nutty Company stocks all types of drywall anchors, making it practical to use fresh fasteners for each installation.